WooCommerce – excelling eCommerce : what is it ?

woo_commerce_logo
WooCommerce is a plugin that can be used to create eCommerce websites on WordPress websites. You could either use it to create an online store from the scratch, or use it to add a store front to your existing WordPress website. WooCommerce is very popular amongst WordPress users, with millions of downloads and this is not unconnected to the fact that WooCommerce has an advanced store management interface that can be used for digital products, as well as physical products.

Targeted Audience: Beginners

This guide would show you how you can set up your own WooCommerce website for free.

Get a Hosting Account:

This is for people who do not already own a WordPress website, and are building their WooCommerce website from the scratch. You would need a hosting account for your website, as well as a unique domain name. Bluehost , DreamHost , WPEngine are good hosting service providers to go with.

Recommened Host Providers

Install WordPress:

The next thing to do is to install WordPress on your website. Installing WordPress is as easy as clicking a button , you might heard of famous five minute installation , if not check this out.Most hosting service providers would have ‘one-click’ install buttons for WordPress so that you don’t have to learn how to write code to be able to install WordPress on your account by yourself.

Install the WooCommerce WordPress Plugin:

At this stage, you are ready to install WooCommerce plugin on your WordPress website. To do this, here are a few steps you should take to make the installation process easy.

You can easily download the WooCommerce plugin from your WordPress dashboard. Simply Log in to your WordPress site dashboard and click on the plugin button, go to Add New and the search for WooCommerce using the inbuilt search engine button. The Woocommerce Plugin should turn up immediately, with the title ‘WooCommerce-excelling ecommerce’ click on the install button and the plugin would be installed on your website immediately.

Activate the WooCommerce WordPress Plugin:

The next step is to activate your newly installed WooCommerce WordPress plugin so that you can now begin to customize it to your taste. To install, you should simply log back into your WordPress dashboard after installing WooCommerce. You would see a message prompt informing you that WooCommerce has been successfully installed. Underneath the message, you would see an activation button, click on Activate plugin to activate.

You would only need to log back into your account if you logged out after installing the Plugin. If you didn’t, you should simply click on the activation button immediately after downloading and installing the WooCommerce Plugin.

woocommerce

Set up Your Pages:

Before your WooCommerce plugin can start functioning properly on your WordPress website, you would need to create some pages but that is not something to stress yourself about because you can simply click on ‘install WooCommerce Pages’ and the Plugin would automatically create pages for your e-commerce website. But if you don’t like the default pages, you can customize it to your preferred style and taste.

General Settings:

There are a few settings you would need to customize before you start using WooCommerce. Click on the general settings button and then on each of the drop-down options to start customizing your website.

  • Location: The first thing you need to select is your location. Simply click on the drop-down button to select your location.
  • Currency: Next, you should choose the currency you want to have played on your website. The prices of your products can be displayed in dollars, pound sterling or any other preferred currency.
  • Allowed Location: If you would like to restrict your customers or audience to a specific location, this is where to set that up.
  • Digital Downloads: If you would be selling digital products, you can select options for handling the digital products like how buyers would gain access and download them.
  • Checkout and Accounts: This function allows you to choose between two individual checkout options for your customers. The first one allows customers to checkout as ‘guests’ meaning that they do not have to create accounts or register on your website to make purchases. You can uncheck this button if you would rather have your customers register on your website before they can check out.

You can also further customize your WooCommerce website and add other unique functions like forcing SSL on checkout, allowing users to register without making purchases and showing order comments section.

Catalog Settings:

This is where you should be able to select how your products would be displayed on your pages. Some of the options on this page include:

Show subcategories on category pages.

Show subcategories on the shop page.

Hide products when showing subcategories.

Redirect to cart after adding product.

Redirect to the product page on single matching search result.

You would also be able to set product data on this page depending on your preferences. For instance, you can enable the SKU field for products or the weight field and product dimension field. You can also decide whether you want to allow product reviews and ratings or not.

At the bottom of the catalog settings page, you would find the images setup options. This is where you would be able to set the dimensions of your product images, how many images you would like to show for each products and the image display style.

Page Setting:

This is where you can change or customize the default pages created for you automatically by the WooCommerce Plugin. You can also add new pages and set up your page permalink structure.

Inventory Settings:

Stock Management is a really great feature to add to your WooCommerce website. It helps your customers to know when goods are out of stock so that they don’t bother ordering goods that are sold out. This is where you can adjust your inventory settings to decide on whether you would like to enable stock management or otherwise.

Tax Settings:

You can also adjust tax settings on your page to suit your local tax rules.

Shipping:

If you are selling downloadable products, you can turn this off completely but otherwise, you can decide to add a variety of shipping options for your customers to choose from, as well as display the costs of such shipping services.

Payment Gateway Setup: This is the most important part of your Woocommerce setup. It helps you determine how you would receive payment for your products. You can choose Paypal, which is the most popular gateways like eWay, Payleap, Sageleap, Sagepay, Stripe and Authorize.net. However, you would need to create accounts with these payment processors before you can use their payment gateway on your website.

At this stage, your WooCommerce installation and setup is complete and you are now ready to start using WooCommerce to sell your products and make money.

Pic Credits: Kickinknowledge

Exploring Jetpack : How it helps to boost functionality

Explaining Jetpack Plugin Features and How it Helps Boost Functionality

If you already have a WordPress website, or you are only just thinking of creating one, you must have come across the name ‘Jetpack’ at least once and you were probably wondering “Okay, what the heck is this about?” Don’t worry, i had the same feeling too when i created my first WordPress website. In fact, i didn’t install the Jetpack Plugin until several weeks and countless nagging by WordPress to install the Plugin. That was years ago when Jetpack wasn’t so popular. But now, every Website owner that uses WordPress CMS knows that one of the first few things to do when creating a WordPress website, is to install a Jetpack Plugin.

But what is Jetpack and why should you care about it?

Jetpack is a Plugin that allows you to enjoy the features of WordPress on your self-hosted website. Before Jetpack, people who created self-hosted websites and wished to enjoy the benefits of WordPress Content Management System had to install dozens of separate Plugins. This rendered the whole system a tad bit complicated for users.

But then, Jetpack came to the rescue. Instead of installing multiple plugins, you now only have to install Jetpack and you would have almost all the Plugins you need on for wordpress.com website.

In a nutshell, Jetpack allows you to install multiple Plugins with just one click and also allows you to update all your plugins the same way.

Jetpack was created by a company known as Automattic, the same people behind WordPress.com, Akismet and Vaultpress. It’s free to install Jetpack on your website, and it’s also completely free to use most of its features. However, there are some plugins and features on Jetpack that you might have to pay for in the future.

Who needs Jetpack Plugin?

As fancy as the Jetpack Plugin is, not every website owner needs to install the Jetpack Plugin. If you have your website/blog hosted on WordPress.com, then you don’t need the WordPress Plugin as WordPress Plugin is only for self-hosted websites.

Features of Jetpack Plugin

Jetpack has a lot of features and some of them include:

Website Protection:

Jetpack helps to protect your website from malicious log in attempts and all types of intrusions.

Single Sign on:

You can have multiple users on your WordPress account, and they can sign on with their WordPress.com accounts.

stats

Easy Site Statistics:

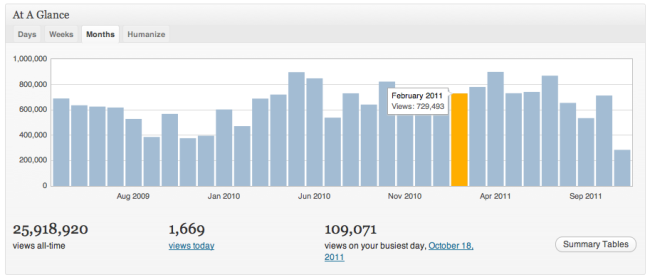
One of the most important features of the Jetpack Plugin is that you can get to monitor your website’s statistics. Jetpack features a Plugin that gives you clear and concise information about who has been visiting your website, and where your website traffic is coming from.

Multidevice Management:

Regardless of how many devices you use, you can login, post and manage your website using Jetpack. So, whether you want to do a quick post with your phone, or prefer to use your personal computer, Jetpack has got you covered.

JetpackCustomCSS

Improved Appearance:

With Jetpack, you can easily improve your website’s appearance and make it friendlier to visitors. Jetpack has Plugins that allow you to:

  • Add extra side bar widgets to your website.
  • Easily create a website icon using any image you prefer.
  • Customize your website’s CSS.
  • Determine which widgets you want to have on the main pages of your website and which ones to hide.

Multimedia:

Every website owner knows that content management has gone beyond just writing a couple of articles and posting them on your website. To increase customer engagement in your content marketing campaign, you now have to include things like site images, videos and several other multimedia content. Jetpack allows you to just that with plugins like:

  • Videopress: Allows you to host videos directly on your website without necessarily using a third party video host.
  • Embed Shortcodes: You can embed videos, slide-share and other similar contents from other websites with zero coding knowledge.
  • Photon: Loading images on your website has never been easier as you can now upload images directly from WordPress content delivery network, with this Plugin. You can also use other photo features like the Carousel and tiled galleries, which both allow you to arrange and display your images in a way that would be attractive and engaging for your website’s visitors.

Mobile Friendly Themes:

These days, almost everyone surfs the website with their mobile gadgets and you really cannot do without a mobile optimized website. Jetpack allows you to install mobile friendly themes on your website for fully optimized mobile viewing.

Increase Social Engagement:

Jetpack also has features that help to increase social engagement. For instance, your users can leave comments on your posts directly from their Facebook or twitter accounts. They can also share posts with their friends and subscribe to receive future posts.

Enhanced WordPress Posting:

Jetpack also enhances your posting experience on WordPress by allowing you use its features like posts by email, spelling and grammar (proofreading service) and other similar functions.

Automatic Backup:

You can also further protect your website with the Vaultpress Jetpack plugin which allows you to do automatic backups and secure your website.

Will Jetpack Bloat My Website and slow it down?

Jetpack is a really heavy file (imagine the size of about 40 plugins in one). Although the developers have done a good job at really stripping down the size. However, for a file that large, should you expect some bloating?

Now here’s the truth………….

Jetpack is a somewhat of a ‘good plugin, bad plugin’ even though the good outweighs the bad aspects. It could either supercharge your website or over bloat it, depending on how you use it. You can actually avoid Jetpack over bloat by configuring only modules that you really need. Of course, you can’t possibly need all the WordPress modules, as there would be a few of them that have no relevance to you.

The Beautiful Math Plugin for instance, allows you to post math formulas and equations on your website easily but how many bloggers really post mathematical formulas on their websites?

Jetpack, like every other plugin, is not perfect and could really use a bit of improvement but one thing is certain, Jetpack is a really valuable plugin that can enhance both the experience of website owners and web visitors and it is really recommended that every website owner installs this valuable plugin on their websites.

How to customize our site using custom css

Most of the times even though we have chosen right theme for site that suits our needs , we still need more or need a little bit of styling to be changed or little functionality to be changed.

In this article i  explain step by step procedure on how to change your site’s appearance (not functionality) using custom css.

There are two ways to add custom css:

Why Plugins or Child Themes , can’t i just add css in my theme’s style.css ?

Simple answer , No. Never do that, Please.

Many people i see in forums ask about how to change my header width and menu items color , background-color and so on when they know css that changes the parts they required , they simply put that in the style.css  of their theme which is a very bad habit why because if the theme is updated that file gets overridden by newer version and so they loose their changes so they have to add their changes again.

Using Custom CSS Plugins:

Okay , now i know i should not change any code in my theme style.css  then how and where to add code and which plugin to choose.

There are many plugins that helps you to add custom css. Most popular ones as of writing this article are Simple Custom CSS by John Regan and Jetpack’s Custom CSS module.

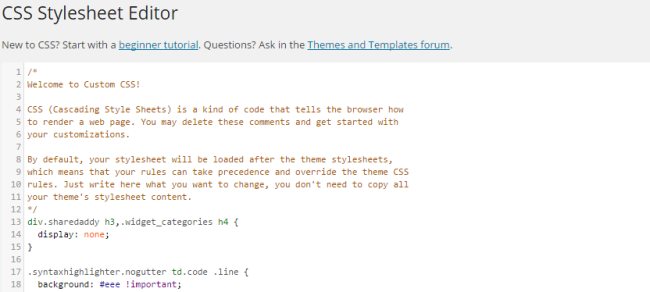
Just active either one of these , if you activated Jetpack’s Module you will see And extra menu item under Appearance which is Edit CSS.

JetpackCustomCSS

You just need to add  your code here right after comments.In the screenshot above you see i have added div.sharedaddy … right after comments or you can delete that commented code entirely.This module also has revisions each time you click Save Stylesheet a revision is saved. this module will store the last 25 revisions made to any theme. These revisions allow you to look back at the recent changes and revert to an earlier version if you need to.

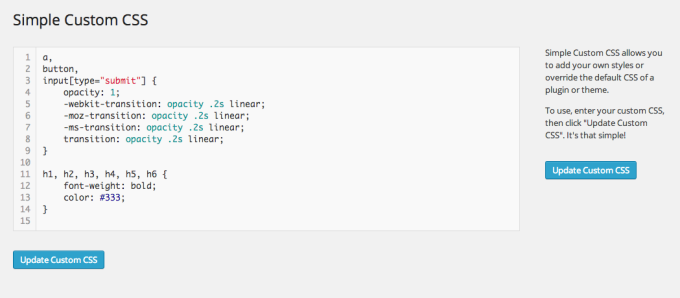
If you are using Simple Custom CSS just after activating you see Custom CSS menu item under Appearance.

simplecustomcss

If you click on that new link you see like above but without any code added with just a comment saying  /* Enter Your Custom CSS Here */. 

You need to add your code here and click on Update CSS button.That’s it , you have now added css.

For these changes you need to know little bit of CSS , it’s not scary you can learn with in no time . If you don’t have time or if you are not into learning then you can find what you ask in support forums or i can help you with that , just hit me here

For example let me show tagline on mobile devices when i’m using Twenty Fifteen Theme , by default this theme does not show tagline on mobile devices.

.site-description {
     display: block;
 }

If i add this  after activating either of the plugins you chose..site’s tagline shows up on mobile devices also.

Improve your content and fully optimize your WordPress Site


wordpress-589121_1280

WordPress itself is a very efficient platform for SEO technically but this doesn’t really mean that there is no scope for improvement!

The WordPress SEO plugin by Yoast makes the SEO of your site better on all required and important aspects. All the technical optimiazation is taken care of by this plugin which persuades you to choose a focus keyword and makes sure that the focus keyword is used everywhere when you’re writing your articles.

Improved content with WordPress SEO

The snippet preview enables you to see how your page or post will appear in the search results. It will help you find out if the length of the title is good or not – if it is too long or too short. The WordPress SEO plugin by Yoast will also guide you to find out if your meta description is making any sense from point of view of search results. Thus, it will lead to increased rankings and also a boost in click through when it comes to organic search results.

Page Analysis

There are many simple things that you may forget but the Page Analysis of The WordPress SEO plugin by Yoast makes sure you do not. For example, it checks the following:

  • If there are images in the content.
  • If you have an alt tag that contains the focus keyword for the content.
  • If the content is long enough.
  • If the meta description has been written.
  • If the focus keyword is included in the meta description.
  • If there are subheadings within the content.
  • And more…


In addition to this, the plugin helps you to write descriptions and meta titles for each of your category, custom taxonomy archives and tag which enables you to optimize these pages further. In short, the plugin will make sure that your post has the content that will be loved by the search engines.

Technical SEO

WordPress itself is very good for SEO. It just needs some minor tweaks. The WordPress SEO plugin will guide through some important settings such as it will remind to enable pretty permalinks. Through automatic optimization and insertion of Google and other search engines friendly meta tags and links, the pliugin even goes beyond that.

Meta & Link Elements

The WordPress SEO plugin enables you to control the pages shown and not shown by Google in the search results. The default setting lets all your pages indexed by the search engines, which includes category and tag, archives but display only the first pages in the results. Is it useful for a visitor to land on the 3rd page of the personal category? The answer is obviously ‘No’.

WordPress by itself displays canonical link elements on only single pages while the canonical link elements are made everywhere by WordPress SEO. In a recent announcement Google said that the link elements rel=”next” and rel=”prev” will also be used in the head section of the paginated archives. The WordPress SEO plugin by Yoast adds these automatically.

XML Sitemaps

When compared to other WordPress plugin, the plugin by Yoast is most advanced when it comes to Sitemaps functions. Once the box is checked, XML sitemaps are automatically created and Google and Bing are notified of the sitemaps existence. The XML sitemaps also include the images in your content and pages enabling them to be found by and show up in search results. You don’t have to worry about the size of your sites as these XML Sitemaps are created to work on sites that are large too. They will also automatically work with custom taxanomies and custom content while providing you the freedom to remove them from the XML sitemap if you desire. The XML sitemaps can be easily read by human eyes too as they use XSL stylesheets, so you can find things that should not be there.

Optimizing RSS

Are scrapers outranking you? Don’t curse them instead use them for your benefit! The WordPress SEO plugin by Yoast automatically adds a link to your RSS feed that points back to the original post and the search engines thus know where to look for the original post. This helps you get rid of the scrapers instantly and boost your chance to rank for your chosen keywords.

Breadcrumbs

If you have a compatible theme such as those based on Genesis or those by Woo Themes, you can make use of the Breadcrumb function that is built-in. This helps to provide easy navigation to visitors and also to the search engines. This supports the search engine to understand the structure your site has.

Social Integration

SEO and Social Media have a great connection, so this plugin also implements a Facebook OpenGraph and it will soon be supporting Google+ sharing tags too.

Compatibility to Multi-Site

Unlike some other plugins, the SEO plugin by Yoast has Multi-Site compatibility. The XML Sitemaps works properly in all type of setups and in the Network settings, you even have the option that enables you to copy settings from one post to another or use the settings of a particular blog as default for other blog

Import & Export

If you run more than one blog, setting plugins for all of them is very time consuming and tiring but this plugin makes things simple. You just need setting up the plugin once and then you can simply export them. After this, you can import the settings on your other sites.

Import for other plugins

If you were previously using another plugin like HeadSpace2 or All In One SEO Pack, you might wish to import your descriptions and tiles that are old. The plugin makes this easy with its import functionality that is built-in. Even for older plugins by Yoast like RSS footer and Robots meta, there is an import functionality.

Best WordPress SEO plugins Yoast vs All in one SEO

The WordPress platform is the single most effective way of sharing content across the internet. With blogging and article writing being the most popular way to communicate with your consumer, you can count on WordPress to help you generate organic traffic to your site even with little to no experience. In this article we will outline some most used SEO plugins that will help enhance your site’s search.

If you’re searching for a way to drive traffic to your site, it is important to understand SEO and how to optimize your WordPress blog. There are hundreds of SEO plug ins to download right from within the dashboard that will help augment your website for maximum performance across all search engines.

Even though, WordPress out of the box offers basic SEO functionality, SEO plug ins are a great tool to help boost your rankings and conversion rates all as a result of each plug ins unique features and options.

Most SEO plug ins focus on identifying important keywords and sentence structures that will help effect the search engines algorithms to better match up your article with other relevant content across the internet.

By using the right SEO plug ins you can extend the functionality of your WordPress Site and its SEO to get a better return on your reader base.

When conducting SEO it is important to know some of these basic tips. When creating an article on WordPress remember that to get the best out of your WordPress site, you’re going to want to pay attention to the keywords you implement into your post.

You’re going to want to have a focus keyword that will appear at least 2-3 times throughout your article that relates back to your articles title. Also, it is important to have a description for your article that focuses on your keywords but is short and precise. To long of a description or title will effect the way your article is indexed and can give your article poor visibility.

Two of the most popular plug ins within the WordPress panel are All in One SEO Pack and WordPress SEO by Yoast. With millions of downloads between each plugin, it would be safe to say that these SEO plugins make a great addition to your WordPress experience.

All In One SEO pack plugin works best to boost your websites SERP. It has a 4.4 out of 5 stars with a positive rating and review section outlining the benefits of this effective SEO program. Its great for beginner and advanced users and starts working right out of the box after install. Here is a list of some the features you can expect from All In One SEO Pack:

All In One SEO Pack Features

  • All In One SEO pack offers XML sitemap support that submits your sites content to Google and Bing search engines helping improve your SEO
  • The only plug in that offers an extensive SEO integration specifically for WordPress sites that run ecommerce
  •  Generates meta tags automatically
  •  Identifies and highlights duplicate content within the body of your post
  • Supports Google Analytics and metrics

If you’re looking for a SEO plugin that helps boost your posts by magnifying your content then SEO by Yoast is the way to go. The Yoast plugin helps you to write better content with its built in content analysis functions.

It can easily pin point and identify errors within your post, identify focus keywords and recommend configuring better sentences for better reader visibility. With over 1 million downloads and a 4.5 out of 5 stars, the SEO by Yoast plugin is the best way to attract new readers.
SEO by Yoast Features

  • It has better seo optimized Social Integration options
  • Automatically generates XML sitemaps
  • Built in content analysis function
  • Provides Snippet Preview to see what your title would look like in Google
  • Robots.txt and .htaccess are editable within the plugin
  • Permalink clean up
  • Available in 26 languages

Yoast also offers several extensions which are worthy to have if you are an advanced WP user.

When using these  SEO plugins you will be able to soon see a significant difference in your sites traffic and word press performance. In order to take advantage of all the features of these SEO plugins, it is important to remember to follow each requirement of the plug ins built in fields. These SEO plugins will help you to not only have a better optimized site but it will also help you become a better blogger as well.

PC: All in SEO Pack plugin page

WordPress SEO By Yoast Vulnerability Puts Websites At High Risk

A perilous vulnerability has been found in the very popular plugin of the WordPress content management platform (CMS) putting about tens of Millions of websites at very high risks of hacking by the attackers.

The vulnerability is in almost all versions of a WordPress plugin which is called ‘WordPress SEO by Yoast’ As per Yoast Website, this plugin has more than fourteen million downloads which makes it one of the most famous plugins of WordPress to optimize websites for various search engines (Search engine optimization or SEO).

The person who discovered this vulnerability in WordPress SEO by Yoast is the developer of ‘WPScan’ (WordPress vulnerability scanner).

According to a published advisory the versions of WordPress SEO by Yoast before 1.7.3.3 are vulnerable to a web application flaw and this is known as ‘Blind SQL Injection’.

The SQLi (SQL injections) are known to be critical vulnerabilities they can lead to database breach and also to leakage of information that is confidential. Usually, in these attacks, a SQL query that is malformed is inserted into an application through client-side input.

How Does The Yoast Vulnerability Work?

However, in this case, the outside hacker cannot trigger the vulnerability itself because the flaw in actuality is located in a file that needs authorization for access and can be accessed only by Admin, Author or Editor and privileged users of WordPress. The file is ‘admin/class-bulk-editor-list-table.php

Thus, a trigger from authorized users is required for successful exploitation of this vulnerability. The attacker can make use of social engineering to trap the authorized users and make them click on a special URL that is payload exploitable.

As explained by Ryan to Graham Cluely (security blogger), if an authorized user of WordPress falls into the trap, the exploit will be allowed to carry execution of arbitrary SQL queries on the WordPress website of the victim.

A proof-of-concept payload was also released by Ryan for Blind SQLi vulnerability in the WordPress SEO by Yoast. This is as below:

http://victim-wordpress-website.com/wp-admin/admin.php?page=wpseo_bulk-editor&
type=title&orderby=post_date%2c(select%20*%20from%20(select(sleep(10)))a)&
order=asc

Patch for the Yoast SQL injection Vulnerability
If reports are to be believed, in the latest version 1.7.4 of WordPress SEO by Yoast, the vulnerability has been patched. The developers of WordPress plugin have done this and this is also mentioned in the changed log. It reads that latest version 1.7.4 has fixed “possible CSRF and blind SQL injection vulnerabilities in bulk editor.”

Normally, it is believed that your website is not seriously complete, if you don’t have the WordPress SEO by Yoast installed. The website owners aim at increasing the traffic of their website using this plugin and this vulnerability is really serious for them.

Thus, the administrators of WordPress that do not have an auto-update feature are highly recommended to upgrade their plugin (WordPress SEO by Yoast) manually as soon as possible. They should visit the WordPress plugin repository to manually download the latest version. If you have the WordPress version 3.7 or above, it is wise to enable the fully automated update of your plugins and themes. You can do this from the tab – Manage – Plugin and Themes – Auto Updates.

Admin Collapse Sub Pages is now translation ready

we know how much important to support our users all around the world whose native language is not English.

In WCSF-2014 , this was also a strong point mentioned by Matt , Co-Founder of WordPress.

So we now made our plugin Admin Collapse Sub Pages Translation ready.All you need to do just load your language.

We need you for translating the plugin, plugin now packed with US,UK English,Telugu,Serbian Language.You can help us by providing translation strings to the following words.

1) Expand All

2) Collapse All

Special Thanks:

We thank Borisa Djuraskovic for his contribution to translate this plugin in Serbian Language.

Unsplash: Stock Photos to Media Library Made Easy

You might have heard of this site Unsplash if you are either designer looking for ideas or a developer who wants to showcase their projects or a blogger who wants to use free photos for their blog posts.

Well now Unsplash WP makes easy to WP users to use their photos with just one click,no need to leave the admin dashboard, it brings photos to media library.Since Unsplash photo licensing allows you the freedom to copy, modify, distribute and use the photos without permission, you can use the images in your commercial endeavors, designs, blog posts, or anywhere on your site.

After installing the plugin you get a new Add Unsplash button beside Add Media button.Well, why are you waiting you then if you have read this much, go and try it once and you love it.

Try now Unsplash