Photo Editing Made Easy with PicMonkey

While there are plenty of photo editing programs available that will allow you to re-size and add custom features to images, some of them come at a price and involve a steep learning curve. Adobe Photoshop is a great tool for those with design experience, but it can be overwhelming for the average WordPress user looking to include images and other multimedia on their posts. User will also have to pay for a subscription and unless you plan on regularly editing images, it might not be worth the money.

Photoshop

Paint

At the other end of the spectrum, WordPress users can always resort of Paint for simple touch-ups, but this program also comes with some serious drawbacks. In can be difficult to save changes and merge images without having to create several files and cut and paste in just the right order. Paint also a limited number of features and it can be easy to distort images during the re-sizing process.

Why Picmonkey is the Best Choice

Picmonkey is a free website that offers the best of photo editing features, all in one easy to use program. While the fact that Picmonkey won’t cost you a thing to use is definitely a plus, the absolute best aspect of the site is that it is super user friendly. If you have enough computer skills to operate WordPress, you will be able to figure out how to execute basic operations and functions in Picmonkey. The website design and available features mimic a lot of other popular publishing programs, so that any skills you have developed will easily translate to this website.

 Available Features

Picmonkey users can edit, touch up or design photos from scratch and put them all together in fun collages. Want to try it out? Simple visit the site and you can use some of their tests samples to try out the different tools. Remove wrinkles, brighten teeth, add text, crop, re-size and do just about anything else to improve your images and create quality images for your posts.

Exploring Jetpack : How it helps to boost functionality

Explaining Jetpack Plugin Features and How it Helps Boost Functionality

If you already have a WordPress website, or you are only just thinking of creating one, you must have come across the name ‘Jetpack’ at least once and you were probably wondering “Okay, what the heck is this about?” Don’t worry, i had the same feeling too when i created my first WordPress website. In fact, i didn’t install the Jetpack Plugin until several weeks and countless nagging by WordPress to install the Plugin. That was years ago when Jetpack wasn’t so popular. But now, every Website owner that uses WordPress CMS knows that one of the first few things to do when creating a WordPress website, is to install a Jetpack Plugin.

But what is Jetpack and why should you care about it?

Jetpack is a Plugin that allows you to enjoy the features of WordPress on your self-hosted website. Before Jetpack, people who created self-hosted websites and wished to enjoy the benefits of WordPress Content Management System had to install dozens of separate Plugins. This rendered the whole system a tad bit complicated for users.

But then, Jetpack came to the rescue. Instead of installing multiple plugins, you now only have to install Jetpack and you would have almost all the Plugins you need on for wordpress.com website.

In a nutshell, Jetpack allows you to install multiple Plugins with just one click and also allows you to update all your plugins the same way.

Jetpack was created by a company known as Automattic, the same people behind WordPress.com, Akismet and Vaultpress. It’s free to install Jetpack on your website, and it’s also completely free to use most of its features. However, there are some plugins and features on Jetpack that you might have to pay for in the future.

Who needs Jetpack Plugin?

As fancy as the Jetpack Plugin is, not every website owner needs to install the Jetpack Plugin. If you have your website/blog hosted on WordPress.com, then you don’t need the WordPress Plugin as WordPress Plugin is only for self-hosted websites.

Features of Jetpack Plugin

Jetpack has a lot of features and some of them include:

Website Protection:

Jetpack helps to protect your website from malicious log in attempts and all types of intrusions.

Single Sign on:

You can have multiple users on your WordPress account, and they can sign on with their WordPress.com accounts.

stats

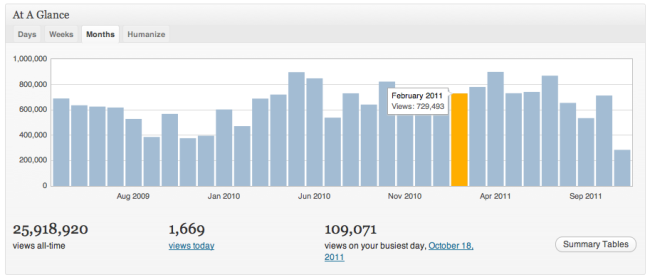
Easy Site Statistics:

One of the most important features of the Jetpack Plugin is that you can get to monitor your website’s statistics. Jetpack features a Plugin that gives you clear and concise information about who has been visiting your website, and where your website traffic is coming from.

Multidevice Management:

Regardless of how many devices you use, you can login, post and manage your website using Jetpack. So, whether you want to do a quick post with your phone, or prefer to use your personal computer, Jetpack has got you covered.

JetpackCustomCSS

Improved Appearance:

With Jetpack, you can easily improve your website’s appearance and make it friendlier to visitors. Jetpack has Plugins that allow you to:

  • Add extra side bar widgets to your website.
  • Easily create a website icon using any image you prefer.
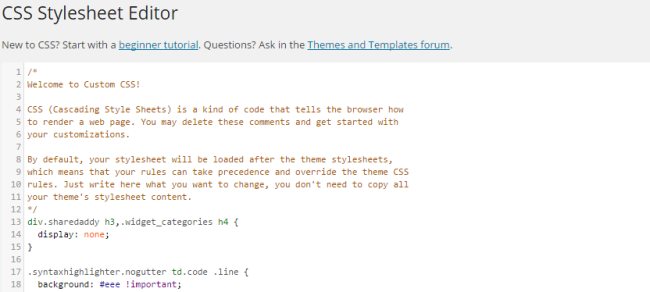
  • Customize your website’s CSS.
  • Determine which widgets you want to have on the main pages of your website and which ones to hide.

Multimedia:

Every website owner knows that content management has gone beyond just writing a couple of articles and posting them on your website. To increase customer engagement in your content marketing campaign, you now have to include things like site images, videos and several other multimedia content. Jetpack allows you to just that with plugins like:

  • Videopress: Allows you to host videos directly on your website without necessarily using a third party video host.
  • Embed Shortcodes: You can embed videos, slide-share and other similar contents from other websites with zero coding knowledge.
  • Photon: Loading images on your website has never been easier as you can now upload images directly from WordPress content delivery network, with this Plugin. You can also use other photo features like the Carousel and tiled galleries, which both allow you to arrange and display your images in a way that would be attractive and engaging for your website’s visitors.

Mobile Friendly Themes:

These days, almost everyone surfs the website with their mobile gadgets and you really cannot do without a mobile optimized website. Jetpack allows you to install mobile friendly themes on your website for fully optimized mobile viewing.

Increase Social Engagement:

Jetpack also has features that help to increase social engagement. For instance, your users can leave comments on your posts directly from their Facebook or twitter accounts. They can also share posts with their friends and subscribe to receive future posts.

Enhanced WordPress Posting:

Jetpack also enhances your posting experience on WordPress by allowing you use its features like posts by email, spelling and grammar (proofreading service) and other similar functions.

Automatic Backup:

You can also further protect your website with the Vaultpress Jetpack plugin which allows you to do automatic backups and secure your website.

Will Jetpack Bloat My Website and slow it down?

Jetpack is a really heavy file (imagine the size of about 40 plugins in one). Although the developers have done a good job at really stripping down the size. However, for a file that large, should you expect some bloating?

Now here’s the truth………….

Jetpack is a somewhat of a ‘good plugin, bad plugin’ even though the good outweighs the bad aspects. It could either supercharge your website or over bloat it, depending on how you use it. You can actually avoid Jetpack over bloat by configuring only modules that you really need. Of course, you can’t possibly need all the WordPress modules, as there would be a few of them that have no relevance to you.

The Beautiful Math Plugin for instance, allows you to post math formulas and equations on your website easily but how many bloggers really post mathematical formulas on their websites?

Jetpack, like every other plugin, is not perfect and could really use a bit of improvement but one thing is certain, Jetpack is a really valuable plugin that can enhance both the experience of website owners and web visitors and it is really recommended that every website owner installs this valuable plugin on their websites.

How to set up your own WordPress Multisite

Before 2010 when WordPress 3.0 was introduced, people who needed to create multiple WordPress websites had to do so using a separate version of WordPress known as the WordPress MultiUser (WPMU). But with WordPress 3.0 came the WordPress Multisite functionality.

Network

WordPress Multisite is simply a feature that allows you to create more than one WordPress website, using the same WordPress account.

Basically, you don’t need to create different WordPress accounts for all your websites; one WordPress account is enough to manage all your websites, no matter how many you decide to create. You can also share Plugins and Themes across all websites on the network, although you would need a separate media directory for each individual website.

WordPress Multisite is a must have feature for bloggers, business owners and internet marketers who constantly find themselves having to discuss several topics or set up different businesses. You don’t want to confuse your visitors by talking about health supplements on a website that’s in the technology niche or discussing real estate on a male grooming blog. Every website owner seeks to establish themselves as an authority in any chosen niche and marrying several niches into one website defeats this purpose. This is why most website owners prefer to create multiple websites across different niches.

However, managing multiple individual websites can be a bit cumbersome and this is why you would love the WordPress Multisite feature because it helps you put all your ‘eggs in a basket’ by having all your websites in one place so that you can easily manage them without stress.

Features of WordPress Multisite

  • Host multiple websites or blogs on one WordPress account.
  • Install WordPress across multiple websites with a single click.
  • Have a network of sub-domains on your WordPress websites.
  • Different users can create accounts or blogs on the same WordPress account.
  • Install WordPress Themes and Plugins to be used across different WordPress Sites.
  • Make changes to your website’s themes and Plugins with one single click.

Who Should Use WordPress Multisite?

WordPress Multisite is a really great feature but it’s not suitable for everyone.  There are a few reasons why you would want to use the WordPress Multisite feature:

  • You have multiple websites that use the same types of themes and Plugins. Using WordPress Multisite features would make it easier for you to install, update and manage all your Plugins across multiple websites instead of updating them one after the other, which would of course take a lot of time.
  • You have a business with multiple branches. WordPress Multisite would allow you create different websites for your branches that you can manage with a single WordPress account. Your staff can also have blogs or websites of their own with WordPress Multisite.
  • You need to create unique subsections on your website. For instance, you may integrate an online into your existing WordPress account, with a unique sub-domain.
  • You really want to avoid wasting time on individually managing all your different websites.

You should n’t use WordPress Multisite if:

  • You have no intentions to create more than one blog or website now or in the future.
  • You want to create multiple websites that would have unique databases.
  • You want your websites to have separate IP addresses.
  • You are setting up websites for different clients with different hosting providers.
  • Your hosting plan does not support hosting of multisite or do not have the necessary server requirements.
  • You can’t edit the files on your server.

Benefits of Using WordPress Multisite

There are a lot of benefits that come with creating your multiple websites using the WordPress multi-site. Some of them include:

  • Single Administrator for multiple websites.
  • Design other sub-sections of your website in your unique way to distinguish it from your main website.
  • Reduce time spent on managing your websites.
  • One click install for WordPress over multiple websites.

Step By Step Guide For Creating a WordPress Multisite

Multisite is very easy to install. If you already have websites with WordPress installed, you can install WordPress Multisite on it. However, you would not be able to use the default permalink structure on your website because there would be a need for WordPress to add the correct names of your sub-domains.

You should also ensure that you backup your files before you install WordPress Multisite on your existing website so that if during installation, something goes wrong, you would be able to re-install the previous version with ease.

To install WordPress Multisite on a new website, here are the steps to take:

Check and Meet Up With All Requirements

  • First, you need a WordPress hosting account and a domain name. There are a lot of cheap hosting service providers that you can use including Bluehost, iPage, SiteGround and Inmotion. All these hosting providers are compatible with WordPress Multisite.
  • Next, you need to install WordPress and activate the WordPress Multisite Networking.

In your WordPress configuration file (wp-config.php), you would see a line that looks like this;

“/*That’s all, stop editing! Happy Blogging.*/”
You need to edit that line and add the following line just before it.
/*Multisite*/
Define (‘WP_ALLOW_MULTISITE’, true);

Then save and upload the wp-config.php file to your server.

After this, your website would be able to support Multisite functions.

  • The next step is to set up your multisite network. To do this, you would need to deactivate all activated Plugins on your website and then in your WordPress dashboard, go to Tools-Network Setup to start your Multisite network configuration.
  • Choose whether you want to install Multisite on your subdomains or subdirectories.
  • You would see a prompt asking you to install Apache’s mod rewrite module, most hosting providers already have this installed so you can just skip this step.
  • Provide a title for your network and include the email address of the network administrator.
  • Click on the install button.

You would be redirected to the network install screen where you would see a bunch of texts provided. Simply copy each of the texts and paste them in your wp-config.php and .htaccess as specified then save the files.

Once this is done, you can now start adding new subdomains to your Network. To do this, log in to your WordPress Admin Account. You would see the WordPress Multisite Network menu, click on it to start customizing your sub-domains.

How to Create a Subdomain on Your Multisite Network

You can add sub-domains to your existing WordPress Multisite Network by going to your Cpanel dashboard. Click on the Domains Section and then the Subdomain section. Click on the Create a Subdomain.

  • In the subdomain field under the ‘Create a Subdomain’ field, enter *
  • Check the document root and ensure that it is pointing to the directory where your WordPress wp-config.php file is located.
  • Then click on the create button to add the subdomain.

You can create and manage new subdomains easily now. Simply go to your WordPress admin account and click on the sites button on your dashboard. You would see a ‘Create a New Site’ Button and a ‘Create a New User Button’. The former allows you to add new subdomains to your website, while the latter is used for adding new users to your Multisite Network.

You can also manage all the sites on your Multisite Network by clicking the Sites button in your Dashboard.

WordPress SEO By Yoast Vulnerability Puts Websites At High Risk

A perilous vulnerability has been found in the very popular plugin of the WordPress content management platform (CMS) putting about tens of Millions of websites at very high risks of hacking by the attackers.

The vulnerability is in almost all versions of a WordPress plugin which is called ‘WordPress SEO by Yoast’ As per Yoast Website, this plugin has more than fourteen million downloads which makes it one of the most famous plugins of WordPress to optimize websites for various search engines (Search engine optimization or SEO).

The person who discovered this vulnerability in WordPress SEO by Yoast is the developer of ‘WPScan’ (WordPress vulnerability scanner).

According to a published advisory the versions of WordPress SEO by Yoast before 1.7.3.3 are vulnerable to a web application flaw and this is known as ‘Blind SQL Injection’.

The SQLi (SQL injections) are known to be critical vulnerabilities they can lead to database breach and also to leakage of information that is confidential. Usually, in these attacks, a SQL query that is malformed is inserted into an application through client-side input.

How Does The Yoast Vulnerability Work?

However, in this case, the outside hacker cannot trigger the vulnerability itself because the flaw in actuality is located in a file that needs authorization for access and can be accessed only by Admin, Author or Editor and privileged users of WordPress. The file is ‘admin/class-bulk-editor-list-table.php

Thus, a trigger from authorized users is required for successful exploitation of this vulnerability. The attacker can make use of social engineering to trap the authorized users and make them click on a special URL that is payload exploitable.

As explained by Ryan to Graham Cluely (security blogger), if an authorized user of WordPress falls into the trap, the exploit will be allowed to carry execution of arbitrary SQL queries on the WordPress website of the victim.

A proof-of-concept payload was also released by Ryan for Blind SQLi vulnerability in the WordPress SEO by Yoast. This is as below:

http://victim-wordpress-website.com/wp-admin/admin.php?page=wpseo_bulk-editor&
type=title&orderby=post_date%2c(select%20*%20from%20(select(sleep(10)))a)&
order=asc

Patch for the Yoast SQL injection Vulnerability
If reports are to be believed, in the latest version 1.7.4 of WordPress SEO by Yoast, the vulnerability has been patched. The developers of WordPress plugin have done this and this is also mentioned in the changed log. It reads that latest version 1.7.4 has fixed “possible CSRF and blind SQL injection vulnerabilities in bulk editor.”

Normally, it is believed that your website is not seriously complete, if you don’t have the WordPress SEO by Yoast installed. The website owners aim at increasing the traffic of their website using this plugin and this vulnerability is really serious for them.

Thus, the administrators of WordPress that do not have an auto-update feature are highly recommended to upgrade their plugin (WordPress SEO by Yoast) manually as soon as possible. They should visit the WordPress plugin repository to manually download the latest version. If you have the WordPress version 3.7 or above, it is wise to enable the fully automated update of your plugins and themes. You can do this from the tab – Manage – Plugin and Themes – Auto Updates.